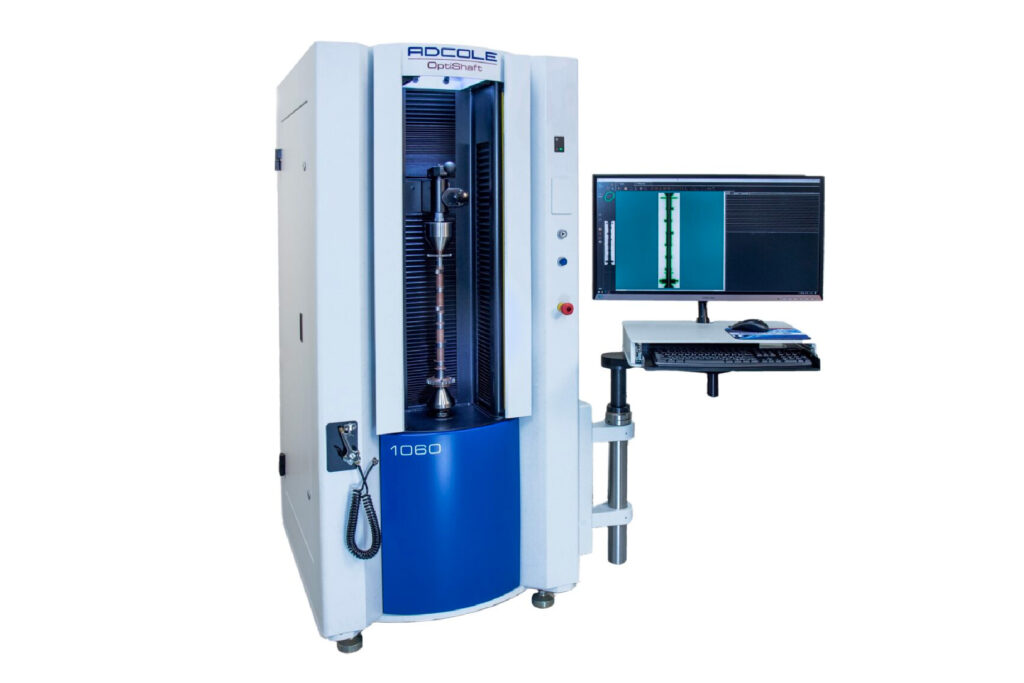
Adcole Material Build-Up & Advanced Straightness software is an advanced linear scan data analysis solution. The software is used to detect any “material build-up” on the leading or trailing edge of the scan. Material build-up is usually found in a zone outside of the straightness calculation range.
Material Build-Up & Advanced Straightness software enables engineers to use specific methods to determine material build-up values:
- Basic Linear Scan Method
- Linear Scan Based on Cheeks
- Linear Scan Based on Alternative Scan Length
- Barreling Specification
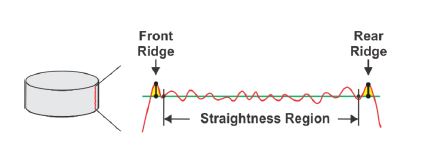
It’s not uncommon for manufacturers to puzzle over why their crankshaft journals are showing material build-up on the leading or trailing edges of a component. As this is a very specific manufacturing issue, obtaining good data about the problem can be an exercise in frustration. That’s why the Material Build-Up & Advanced Straightness software is such a powerful tool for tackling this dilemma. The software allows users to analyze linear scan data, broken down into segmented regions. The defined center region can be analyzed for straightness, concavity, convexity, and barreling. The end sections can be analyzed for maximum and minimum error. The end section analysis is critical for material build-up problem solving because the maximum error at the end regions of the linear scan is where the material straightness issue is detected and recorded if it exists.
Linear Scan Measurements
By extending linear scan measurements and analysis, engineers can determine any manufacturing issues exist near the edges of the journal. Specifically, material build-up analysis enables manufacturers to pinpoint if they are experiencing wheel breakdown, subsequently resulting in “material build up” at the edge of the journal. This Adcole software solution provides the means to specify the linear scan reduction method for determining the area for straightness plus other parameters, including two edge sections for material build-up

Material Build-Up & Advanced Straightness Software measures the following parameters:
- 배럴링
- 컨캐비티
- 볼록성
- 지역별 최대 오류
- 지역별 최소 오류
- 프로필 오류
- 직진성
Material Build-Up & Straightness software can measure one or more linear traces on a crankshaft journal, using assorted measurement methods. The basic method is to measure the journal from the lower radial cut to the upper radial cut. Alternatively, a different method is to measure the cheek positions of a journal and then take a linear measurement based on the actual length of the journal. Recently, Adcole developed an option that uses alternative scan length measurements for material build-up and straightness. This feature enables uses to set a scan length that is larger than the distance between the lower and upper radial cut positions. In addition, this capability provides an option to measure a larger percentage of the journal surface without the need of measuring the faces (thereby saving cycle time).
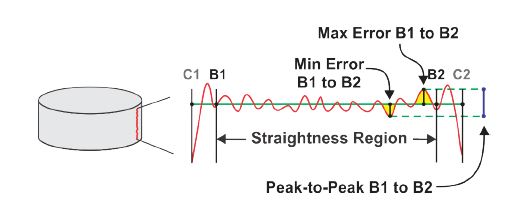
Customers using the software report that they can find material build-up found outside of the straightness calculation range, and take action to correct it. The solution offers 3 different measuring methods to provide the most accurate, and specific measurement data available for material build-up and straightness. It enables manufacturers to analyze linear scan data broken down into segmented regions, and permits engineers to define the center region of a crankshaft and analyze it for straightness, concavity, convexity, and barreling.
Incremental Straightness
According to the geometric dimension and tolerancing definition, straightness has two very different functions, depending on how it is spelled out. In its normal form or Surface Straightness, the term straightness is a tolerance that controls the form of a line somewhere on the surface or the feature. Axis Straightness is a tolerance that controls how much curve is allowed in a part’s axis. This is usually called out with an included call to maximum material condition.
The incremental straightness function of the Material Build-Up & Advanced Straightness software offers manufacturers the ability to define a window, or a segment, of a part and obtain data about the window in inch or millimeter-spaced sections. This is a powerful capability because this software has the capability to detect maximum peak-to-peak error over a small, specified segment of a part.
Incremental straightness data is important to manufacturers because it provides a valuable data source for determining the source of manufacturing issues. These include problems like grinding wheel breakdown, tooling issues, or other complications associated with the machines or tooling being used to make parts.
Flexible Measurement Methods
The software offers flexible measurement methods to drill down into the data to determine where material build-up is occurring, and its root cause. It provides an intuitive means to detect material build-up on the leading or trailing edge of the scan, affording the means to enable manufacturers to improve a high value fabrication process. Lastly, Material Build-Up & Straightness software is an effective solution for determining material build-up and material straightness issues.
To learn more about Material Build-Up & Straightness software, click 여기.


